Catering Made Simple
Learn how to accept catering orders online and save hours every week with a simple, automated system
-
-
Lesson 1: Welcome, Let’s Launch Your Catering Form!
In this lesson, I’m showing you exactly what we’re building and what you can expect by the end of this course.
In this lesson, I’m showing you exactly what we’re building and what you can expect by the end of this course.
-
Lesson 2: Start With a Ready-Made Template
In this lesson, I show you how to clone the catering form instantly, customize the branding, and make it look like something your customers can trust immediately.
In this lesson, I show you how to clone the catering form instantly, customize the branding, and make it look like something your customers can trust immediately.
-
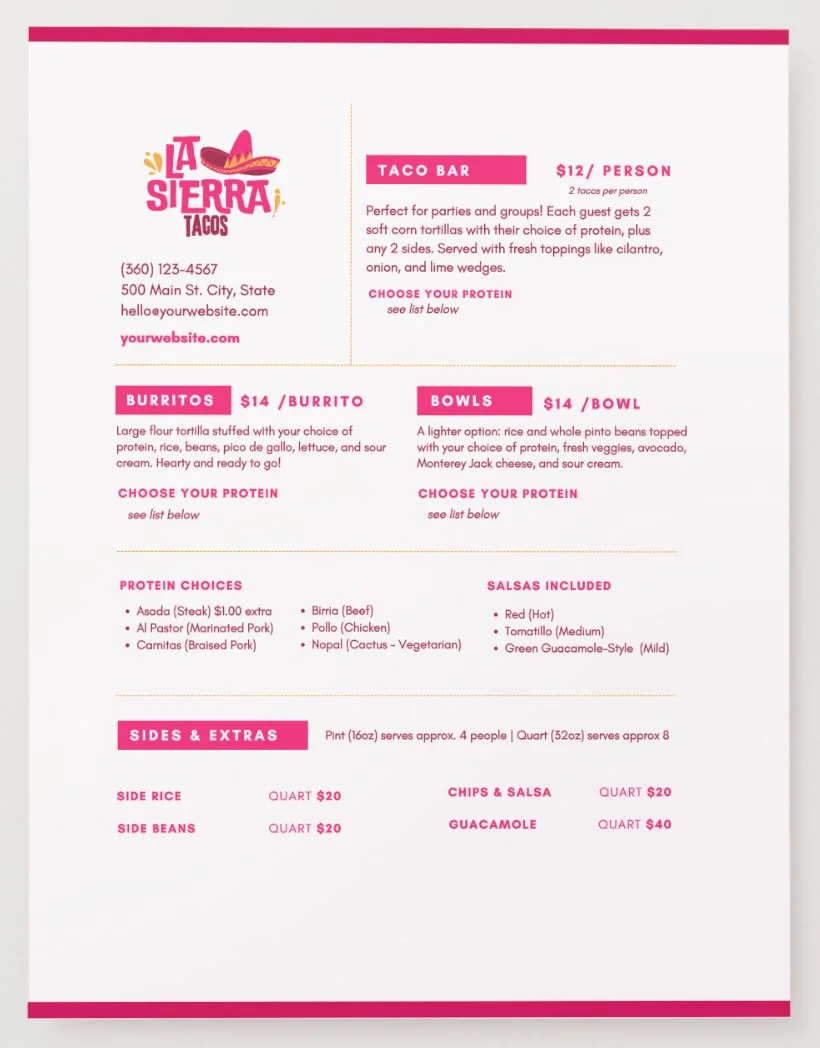
Lesson 3: Adding Your Menu Items
This is the heart of your catering form — your menu. I walk you through how to add each item, upload photos that sell, and structure your prices so customers instantly understand their options.
This is the heart of your catering form — your menu. I walk you through how to add each item, upload photos that sell, and structure your prices so customers instantly understand their options.
-
Lesson 4: Collect the Right Customer & Event Details
This lesson is all about making your life easier. I show you how to set up event fields so you collect everything you need, without overwhelming customers or causing them to abandon the form.
We also set limits and blackout dates so customers only select times that actually work for you.This lesson is all about making your life easier. I show you how to set up event fields so you collect everything you need, without overwhelming customers or causing them to abandon the form.
We also set limits and blackout dates so customers only select times that actually work for you. -
Lesson 5: How to Get Paid for Your Catering Orders
Let’s talk money. In this lesson, I show you the two payment paths and help you choose what works best for your workflow. I also walk you through connecting Square, turning on payment options like Google Pay, and setting up automatic receipts. This is the step that takes you from “interested” customers to paid orders.
Let’s talk money. In this lesson, I show you the two payment paths and help you choose what works best for your workflow. I also walk you through connecting Square, turning on payment options like Google Pay, and setting up automatic receipts. This is the step that takes you from “interested” customers to paid orders.
-
Lesson 6: Testing Your Form
In this lesson, I walk you through running a test order so you can feel confident before launching. We’ll check emails, notifications, and your thank-you page to make sure everything is clean, branded, and ready for customers. This step eliminates surprises and gives you full confidence going live.
In this lesson, I walk you through running a test order so you can feel confident before launching. We’ll check emails, notifications, and your thank-you page to make sure everything is clean, branded, and ready for customers. This step eliminates surprises and gives you full confidence going live.
-
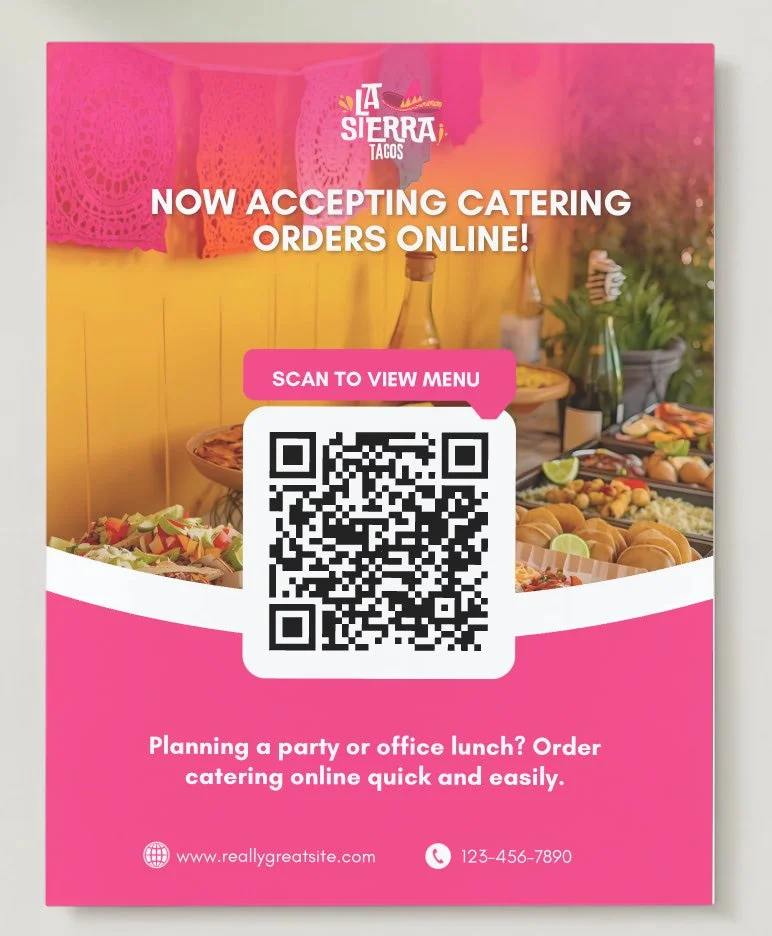
Lesson 7: How to Share Your Order Form and Customize Your QR Code
In this lesson, I walk you through running a test order so you can feel confident before launching. We’ll check emails, notifications, and your thank-you page to make sure everything is clean, branded, and ready for customers. This step eliminates surprises and gives you full confidence going live.
In this lesson, I walk you through running a test order so you can feel confident before launching. We’ll check emails, notifications, and your thank-you page to make sure everything is clean, branded, and ready for customers. This step eliminates surprises and gives you full confidence going live.
-
Free Canva Templates